Overview
If you want to transfer a large amount of customer information between Virto Commerce and another system, then you can use a specially-formatted spreadsheet to import or export that data. Virto Commerce uses CSV (semicolon-separated value) files to perform this kind of bulk task.
The business goal for the module is to provide to non-technical not high skilled business users (like customer manager) who works with customers on a daily basis and do not understand the database structure to work comfortably with customers export and import functionality using it for customers management.
Note If you want to automated transferring information from 3rd party system, like ERP, then see API, Integration Middleware approach and Azure Logic Apps connectors.
Business scenarios
- I need to create a new organization with customers.
- I need to make bulk changes for multiple customers in the organization of few hundreds of records.
- I need to migrate contacts from another system.
- I need to migrate organizations from another system.
Using CSV
Get a sample CSV file. You can export and view a sample contacts or organizations CSV file and use it as a template.
Contact CSV file format for import
The first line of CSV file should be Header:
Contact First Name *required
Contact Last Name *required
Contact Full Name *required
Contact Id
Contact Outer Id
Organization Id
Organization Outer Id
Organization Name
Email
Account Login *required for account
Store Id *required for account
Store Name
Account Email *required for account
Account Type
Account Status
Email Verified
Contact Status
Associated Organization Id
Birthday
TimeZone
Phones
Salutation
Default language
Taxpayer ID
Preferred communication
Preferred delivery
Address Type *required for address
Address First Name *required for address
Address Last Name *required for address
Address Country *required for address
Address Region *required for address
Address City *required for address
Address Line1 *required for address
Address Line2 *required for address
Address Zip Code *required for address
Address Email *required for address
Address Phone *required for address
All Dynamic Properties
Each column must be separated by a semicolon. Only Contact First Name, Contact Last Name, Contact Full Name values are required for Contact creation.
All Address values are required for creation/updating address. If you don't need to create/update address leave it empty.
You can create new account in relation to contact. Account name, Account email, Store id values are required for Account creating. Account name and Account email should be unique for each account. Please notice, you can only create account, but not update.
In case of errors full contact line will be skipped. You can download error report on statistics page and check error detail for skipped line.
Example: Contacts_sample.csv
Organizations CSV file format for import
The first line should be Header:
Organization Name *required
Organization Id
Organization Outer Id
Address Type *required for address
Address First Name *required for address
Address Last Name *required for address
Address Country *required for address
Address Region *required for address
Address City *required for address
Address Address Line1 *required for address
Address Address Line2 *required for address
Address Zip Code *required for address
Address Email *required for address
Address Phone *required for address
Phones
Business category
Description
All Dynamic Properties
Each column must be separated by a semicolon. Only Organization name value is required for creation organization.
All Address values are required for creation/updating address. If you don't need to create/update address leave it empty.
In case of errors organization line will be skipped. You can download error report on statistics page and check error detail for skipped line.
Example: Organizations_sample.csv
Export Contacts and Organizations
Export selected organizations
- The user opens root of Contact Module
- Select few organizations > click export
- The system opens the Simple export dialog screen with the text "NUM contacts NUM organizations will be exported to csv file."
- User confirms export
- The system opens the processing blade with links when the export is finished
- Links to download organizations.csv file and contacts.csv file are displayed.
If Contact has more than one related accounts, organizations, addresses than only one account, organization, address will be exported according to this contact.
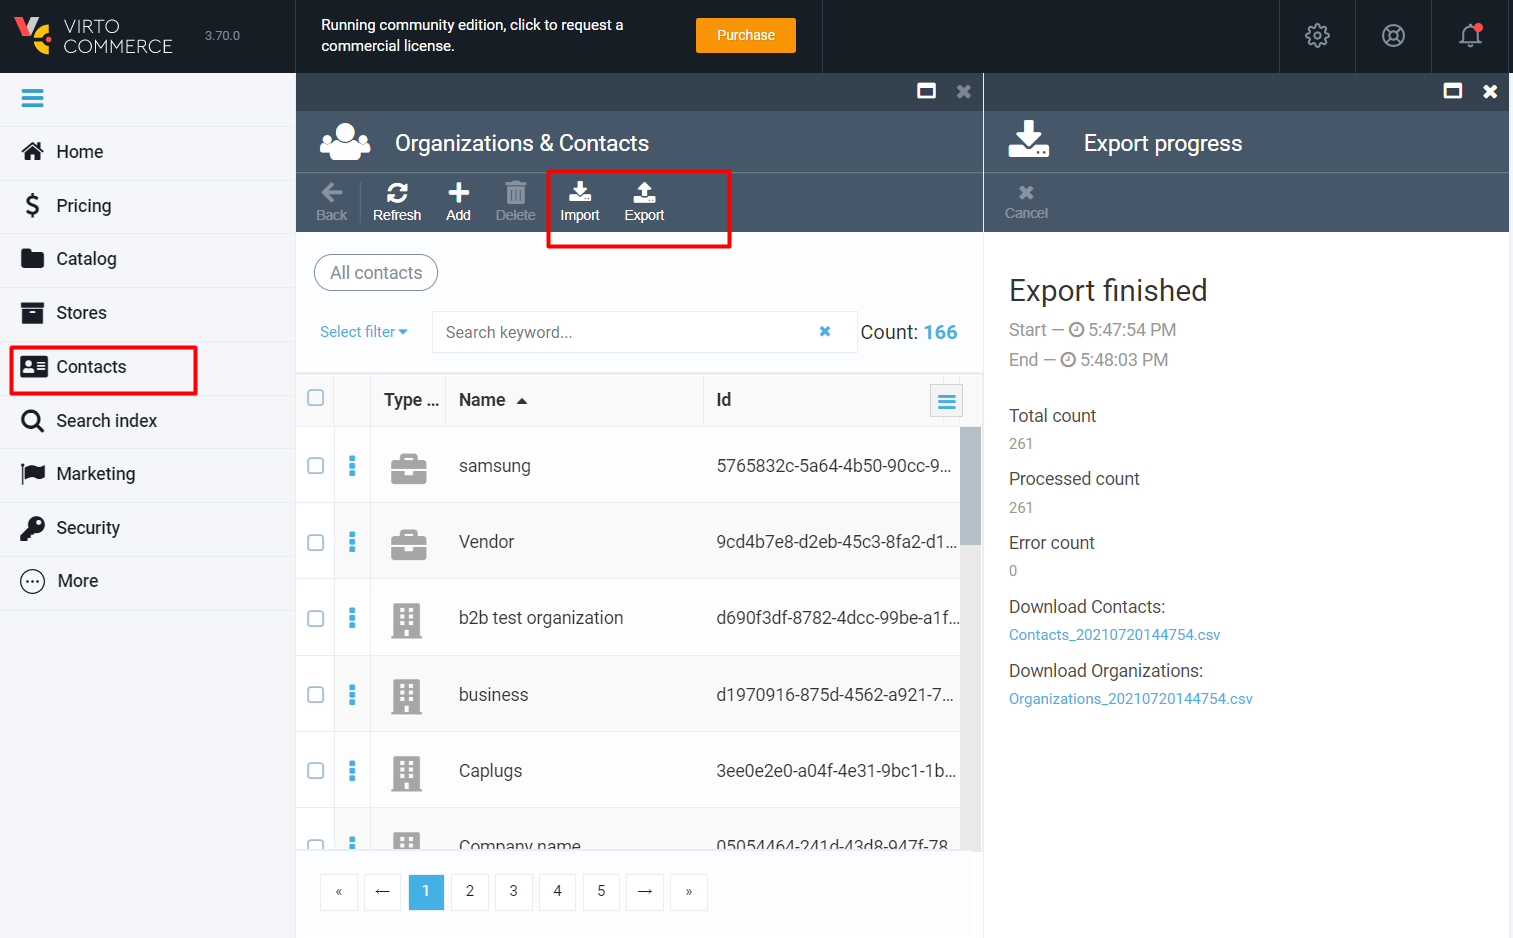
Export all from Customer module
- The user opens root of Contact Module
- Click export
- The system opens the Simple export dialog screen with the text "NUM contacts NUM organizations will be exported to csv file."
- User confirms export
- The system opens the processing blade with links when the export is finished
- Links to download organizations.csv file and contacts.csv file are displayed
Contacts import
Create new contacts and new organizations
- The user opens root of Contact Module > click import
- Upload file >
- The system shows Uploaded CSV file
- The user opens uploaded file to preview > Click Import
- The system shows a popup with the text: "NUM contacts will be added according to linked organizations"
- The system creates new organizations if their Id and OuterID not exist in the system
You should select the type of CSV file (contact or organization) before browsing and uploading the file to the system
Create contacts into organization
- The user opens Contact Module > Open Name organization > click Import
- Upload file >
- The system shows Uploaded CSV file
- The user opens uploaded file to preview > Click Import
- The system shows a popup with the text: "NUM contacts will be added into Name organization"
- The system creates new contacts into the Name organization
Create accounts throught contact.csv import
- The user opens root of Contact Module > click import
- Upload file >
- The system shows Uploaded CSV file
- The user opens uploaded file to preview > Click Import
- The system shows a popup with text: "NUM contacts will be imported"
- The system creates accounts in relation to contact in the system
Update existing contacts
- The user opens root of Customer management module > click import
- Upload file >
- The system shows Uploaded CSV file
- The user opens uploaded file to preview > Click Import
- The system shows a popup with text: "NUM contacts will be imported"
- The system finds contacts and organization in the system by Id or Outer Id and updates them
Import Organizations
Create new organizations
- The user opens root of Customer management module > click import
- Upload file >
- The system shows Uploaded CSV file
- The user opens uploaded file to preview > Click Import
- The system shows a popup with the text: "NN organizations will be imported"
- The system creates a new organization and places it in the root.
It is important to know that organizations can be imported into root only
Update existing organizations
- The user opens root of Customer management module > click import
- Upload file >
- The system shows Uploaded CSV file
- The user opens to preview uploaded file > Click Import
- The system shows a popup with the text: "NN organizations will be imported"
- The system finds Organizations in the system by Id or Outer Id and updates them. Organization places into the Root
Advanced settings
Limit for number of lines to export = 10.000 by default.
Ask system administrator to change it throught an environment variable for CustomerExportImport__Export__LimitOfLines
Limit for number of lines to import = 10.000 by default.
Ask system administrator to change it throught an environment variable for CustomerExportImport__Import__LimitOfLines
Limit for size of csv file = 1mb by default.
Ask system administrator to change it throught an environment variable for CustomerExportImport__Import__FileMaxSize
Requirements for data
For both contacts & organizations:
Address Country, Address Country Code should follow ISO 3166-1 alpha-3 standard
Dynamic property: type sh
Address Country, Address Country Code should follow ISO 3166-1 alpha-3 standard
Dynamic property: type should correlate to specified in admin
Maximum length for values in columns:
Address First Name - 128
Address Last Name - 128
Address Email - 64
Address Phone - 256
Address Line 1 - 128
Address Line 2 - 128
Address City - 128
Address Region - 128
Address Country Code - 64
Address County - 128
Address Zip Code - 32
Dynamic property with type ShortText - 512 per value
Phones - 64 per value
Contact Outer Id - 128
Contact First Name - 128
Contact Last Name - 128
Contact Full Name - 254
Organization Outer Id - 128
Organization Name - 128
Contact Status - 64
TimeZone - 32
Salutation - 256
Default Language - 32
Tax Payer Id - 64
Preferred Delivery - 64
Preferred Communication - 64
Organization Outer Id - 128
Organization Name - 128
Business Category - 64