Build and Customize Platform Manager UI
Use this guide to create Platform Manager UI for the Virto Commerce Customer Reviews module created here.
After completing this lesson, a Platform Manager UI for the Virto Commerce "Customer Reviews" module will be created, including:
- Blade with the customer reviews list for products.
- Widget on the product page to view the number of reviews and open the new reviews blade for the product.
To build and customize platform manager UI:
Prerequisites
- Installed Virto Commerce Platform Manager.
- Visual Studio 2022 or higher.
- Basic JavaScript (AngularJS) knowledge.
- Created custom module.
Platform Manager UI Elements
The most common extension points for Platform Manager UI are:
-
Blade: The main UI element of the Platform Manager. Every blade has basic parts such as Maximize, Close buttons on the top and the title, toolbar, main content placeholders following down.
-
Toolbar: A dedicated area inside blade for adding commands. Hereinafter, the toolbar commands shall be referenced to as toolbar items.

-
Metaform: A placeholder (container) control that renders UI content based on provided metadata.
-
Widget: A transient or auxiliary tile that:
- Provides some useful information displayed in place.
- Usually enables opening additional blade with extra information and functionality.
- Is reusable and can be added to many blades (widget containers) in various places.
Debug Scripts
To enable JS debugging in the Platform:
-
Set app
VirtoCommerce:EnableBundlesOptimizationsvalue to false in the platform's Web.config: -
Use the developer tools inside your browser, to debug the JS code.
Build Customer Reviews Module Web UI
To build the module WEB UI:
-
Place Platform Manager UI elements into CustomerReviewsModule.Web\Scripts folder. Typical structure of this folder:
Scripts │ ├── blades │ ├── (AngularJS controllers and templates for the module blades) │ ├── resources │ ├── (AngularJS definitions of the resources (API endpoints) exposed and used by this module) │ ├── widgets │ ├── (AngularJS controllers and templates for the module widgets) │ └── module.js ├── (Main entry point for the module UI, containing AngularJS module definition, registrations for menus, widgets, etc.) -
Localize UI elements. The localization is based on resources (translation files) placed in CustomerReviewsModule.Web\Localizations folder.
Create Localization
-
Define the following names for blade and widget:
- Blade title.
- Blade labels (column names, "no-review" title).
- Widget title.
-
Create the translation file \Localizations\en.CustomerReviewsModule.json to localize the defined names.
These translations will be used in the blade and in the widget to label titles and field names in Platform Manager UI.
Define API Controller
To get data from backend, define search API controller method in the \CustomerReviewsModule.Web\Scripts\resources\customer-reviews-module-api.js file:
angular.module('customerReviewsModule')
    .factory('customerReviewsModule.webApi', ['$resource', function ($resource) {
        return $resource('api/customer-reviews-module', {}, {
            search: { method: 'POST', url: 'api/customer-reviews-module/search' }
        });
 }]);
Define Blade
-
Create a new reviews-list.js blade JS file in the \Scripts\blades folder and define customerReviewsModule.reviewsListController by adding code to the file:
angular.module('customerReviewsModule') .controller('customerReviewsModule.reviewsListController', ['$scope', 'customerReviewsModule.webApi', 'platformWebApp.bladeUtils', 'uiGridConstants', 'platformWebApp.uiGridHelper', function ($scope, reviewsApi, bladeUtils, uiGridConstants, uiGridHelper) { $scope.uiGridConstants = uiGridConstants; var blade = $scope.blade; var bladeNavigationService = bladeUtils.bladeNavigationService; blade.getSearchCriteria = function () { return angular.extend(filter, { searchPhrase: filter.keyword ? filter.keyword : undefined, sort: uiGridHelper.getSortExpression($scope), skip: ($scope.pageSettings.currentPage - 1) * $scope.pageSettings.itemsPerPageCount, take: $scope.pageSettings.itemsPerPageCount }); }; blade.refresh = function () { blade.isLoading = true; reviewsApi.search(blade.getSearchCriteria(), function (data) { blade.isLoading = false; $scope.pageSettings.totalItems = data.totalCount; blade.currentEntities = data.results; }); }; blade.headIcon = 'fa-comments'; blade.toolbarCommands = [ { name: "platform.commands.refresh", icon: 'fa fa-refresh', executeMethod: blade.refresh, canExecuteMethod: function () { return true; } } ]; // simple and advanced filtering var filter = $scope.filter = blade.filter || {}; filter.criteriaChanged = function () { if ($scope.pageSettings.currentPage > 1) { $scope.pageSettings.currentPage = 1; } else { blade.refresh(); } }; // ui-grid $scope.setGridOptions = function (gridOptions) { uiGridHelper.initialize($scope, gridOptions, function (gridApi) { uiGridHelper.bindRefreshOnSortChanged($scope); }); bladeUtils.initializePagination($scope.$parent); }; }]); -
To show a list of reviews in a blade, create a new reviews-list.tpl.html blade template file in the same folder:
<div class="blade-static"> <div class="form-group"> <div class="form-input __search"> <input placeholder="{{'platform.placeholders.search-keyword' | translate}}" ng-model="filter.keyword" ng-keyup="$event.which === 13 && filter.criteriaChanged()" /> <button class="btn __other" style="position: relative;right: 45px;"> <i class="btn-ico fa fa-times-circle" title="Clear" ng-click="filter.keyword=null;filter.criteriaChanged()"></i> </button> </div> <p class="form-count">{{ 'platform.list.count' | translate }}: <span class="count">{{pageSettings.totalItems | number:0}}</span></p> </div> </div> <div class="blade-static __bottom" ng-if="pageSettings.itemsPerPageCount < pageSettings.totalItems" ng-include="'pagerTemplate.html'"></div> <div class="blade-content"> <div class="blade-inner"> <div class="inner-block"> <div class="table-wrapper" ng-init="setGridOptions({ useExternalSorting: true, rowTemplate: 'list.row.html', columnDefs: [ { name: 'content', displayName: 'customerReviewsModule.blades.review-list.labels.content' }, { name: 'modifiedDate', displayName: 'customerReviewsModule.blades.review-list.labels.modifiedDate', sort: { direction: uiGridConstants.DESC }} ]})"> <div ui-grid="gridOptions" ui-grid-auto-resize ui-grid-save-state ui-grid-resize-columns ui-grid-move-columns ui-grid-pinning ui-grid-height></div> </div> <p class="note" ng-if="!blade.currentEntities.length">{{ 'customerReviewsModule.blades.review-list.labels.no-review' | translate }}</p> </div> </div> </div> <script type="text/ng-template" id="list.row.html"> <div ng-click="grid.appScope.blade.selectNode(row.entity)" ng-repeat="(colRenderIndex, col) in colContainer.renderedColumns track by col.uid" ui-grid-one-bind-id-grid="rowRenderIndex + '-' + col.uid + '-cell'" class="ui-grid-cell" ng-class="{'ui-grid-row-header-cell': col.isRowHeader, '__hovered': grid.appScope.contextMenuEntity === row.entity, '__selected': row.entity.id===grid.appScope.selectedNodeId }" role="{{col.isRowHeader ? 'rowheader' : 'gridcell' }}" ui-grid-cell></div> </script> -
Update the blade shown on activating the
workspace.customerReviewsModuleStatestate in the AngularJS module by editing \Scripts\module.js:angular.module(moduleName, []) .config(['$stateProvider', '$urlRouterProvider', function ($stateProvider, $urlRouterProvider) { $stateProvider .state('workspace.customerReviewsModuleState', { url: '/customerReviewsModule', templateUrl: '$(Platform)/Scripts/common/templates/home.tpl.html', controller: [ '$scope', 'platformWebApp.bladeNavigationService', function ($scope, bladeNavigationService) { var newBlade = { id: 'reviewsList', title: 'customerReviewsModule.blades.review-list.title', controller: 'customerReviewsModule.reviewsListController', template: 'Modules/$(CustomerReviewsModule)/Scripts/blades/reviews-list.tpl.html', isClosingDisabled: true }; bladeNavigationService.showBlade(newBlade); } ] }); } ])When the state is "activated", the blade's controller is bound to its template and the new blade is shown.
-
Delete \CustomerReviewsModule.Web\Scripts\blades\hello-world.html and \CustomerReviewsModule.Web\Scripts\blades\hello-world.js files created here.
-
Save all changes, restart the Platform application and open blade in main menu.
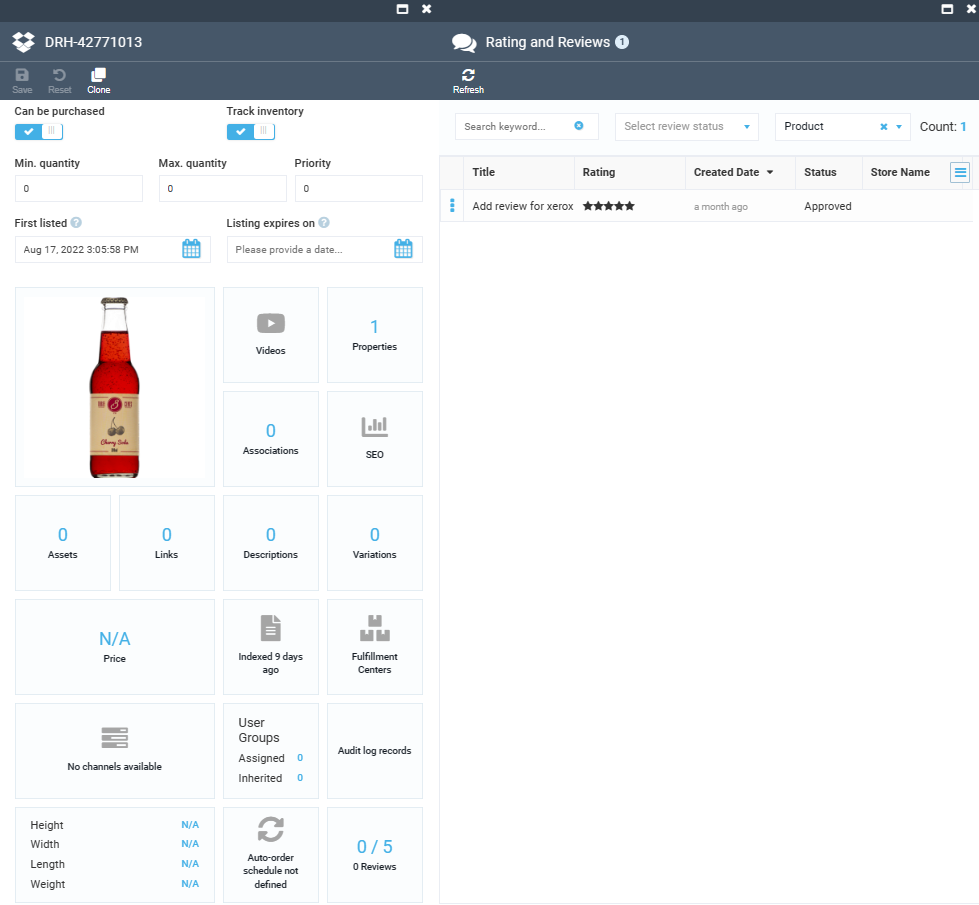
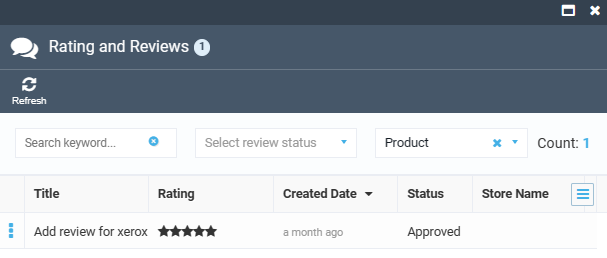
You will see the existing Customer reviews list:
Define Widget
-
Add new widgets subfolder inside the Scripts folder.
-
Create a new customerReviewWidget.js widget JS file in widgets folder and define customerReviewsModule.customerReviewWidgetController by adding code to the file:
angular.module('customerReviewsModule') .controller('customerReviewsModule.customerReviewWidgetController', ['$scope', 'customerReviewsModule.webApi', 'platformWebApp.bladeNavigationService', function ($scope, reviewsApi, bladeNavigationService) { var blade = $scope.blade; var filter = { take: 0 }; function refresh() { $scope.loading = true; reviewsApi.search(filter, function (data) { $scope.loading = false; $scope.totalCount = data.totalCount; }); } $scope.openBlade = function () { if ($scope.loading || !$scope.totalCount) return; var newBlade = { id: "reviewsList", filter: filter, title: 'Customer reviews for "' + blade.title + '"', controller: 'customerReviewsModule.reviewsListController', template: 'Modules/$(CustomerReviewsModule)/Scripts/blades/reviews-list.tpl.html' }; bladeNavigationService.showBlade(newBlade, blade); }; $scope.$watch("blade.itemId", function (id) { filter.productIds = [id]; if (id) refresh(); }); }]); -
Create a new customerReviewWidget.tpl.html widget template file in the same folder:
<div class="gridster-cnt" ng-click="openBlade()"> <div class="cnt-inner"> <div class="list-count" ng-if="loading">...</div> <div class="list-count" ng-if="!loading">{{ totalCount }}</div> <div class="list-t" ng-if="!loading">{{ 'customerReviewsModule.widgets.itemdetail.title' | translate }}</div> </div> </div> -
Inject the new widget into the Product detail UI by registering it in module.js:
.run(['platformWebApp.mainMenuService', 'platformWebApp.widgetService', '$state', function (mainMenuService, widgetService, $state) { //Register module in main menu var menuItem = { path: 'browse/customerReviews', icon: 'fa fa-comments', title: 'Customer Reviews', priority: 100, action: function () { $state.go('workspace.customerReviewsModuleState'); }, permission: 'customerReview:read' }; mainMenuService.addMenuItem(menuItem); //Register reviews widget inside product blade var itemReviewsWidget = { controller: 'customerReviewsModule.customerReviewWidgetController', template: 'Modules/$(CustomerReviewsModule)/Scripts/widgets/customerReviewWidget.tpl.html' }; widgetService.registerWidget(itemReviewsWidget, 'itemDetail'); } ]); -
Save all changes, restart application and open Product detail blade.
The new widget appears in the widget container and shows actual number of existing reviews for the product. Click on the widget to display the list of Customer reviews for the product.