Elastic App Search
Virto Commerce and Elastic App Search brings the next level of employee experience. You can use analytics to improve ecommerce search relevance without development.
Elastic App search provides search, aggregation, and analytic capabilities as a service, on top of ElasticSearch. It also supplies tools that can help you tune search result sets without development:
Read more about how to deploy Elastic App Search here.
Deploy Elastic App Search using Docker
- Install
Dockerfor Windows or for Linux. - Install
Elastic App SearchContainer usingDocker-Compose.- Create a directory and create a file named
.envinside:STACK_VERSION=8.3.3 ELASTIC_PASSWORD=!!!changeme!!! KIBANA_PASSWORD=!!!changeme!!! ES_PORT=9200 CLUSTER_NAME=es-cluster LICENSE=basic MEM_LIMIT=1073741824 KIBANA_PORT=5601 ENTERPRISE_SEARCH_PORT=3002 ENCRYPTION_KEYS=secret - Create a strong password and place it instead of !!!changeme!!!
-
Create a file named
docker-compose.ymland place it alongside.envfile:version: "2.2" services: setup: image: docker.elastic.co/elasticsearch/elasticsearch:${STACK_VERSION} volumes: - certs:/usr/share/elasticsearch/config/certs user: "0" command: > bash -c ' if [ x${ELASTIC_PASSWORD} == x ]; then echo "Set the ELASTIC_PASSWORD environment variable in the .env file"; exit 1; elif [ x${KIBANA_PASSWORD} == x ]; then echo "Set the KIBANA_PASSWORD environment variable in the .env file"; exit 1; fi; if [ ! -f certs/ca.zip ]; then echo "Creating CA"; bin/elasticsearch-certutil ca --silent --pem -out config/certs/ca.zip; unzip config/certs/ca.zip -d config/certs; fi; if [ ! -f certs/certs.zip ]; then echo "Creating certs"; echo -ne \ "instances:\n"\ " - name: es01\n"\ " dns:\n"\ " - es01\n"\ " - localhost\n"\ " ip:\n"\ " - 127.0.0.1\n"\ > config/certs/instances.yml; bin/elasticsearch-certutil cert --silent --pem -out config/certs/certs.zip --in config/certs/instances.yml --ca-cert config/certs/ca/ca.crt --ca-key config/certs/ca/ca.key; unzip config/certs/certs.zip -d config/certs; fi; echo "Setting file permissions" chown -R root:root config/certs; find . -type d -exec chmod 750 \{\} \;; find . -type f -exec chmod 640 \{\} \;; echo "Waiting for Elasticsearch availability"; until curl -s --cacert config/certs/ca/ca.crt https://es01:9200 | grep -q "missing authentication credentials"; do sleep 30; done; echo "Setting kibana_system password"; until curl -s -X POST --cacert config/certs/ca/ca.crt -u elastic:${ELASTIC_PASSWORD} -H "Content-Type: application/json" https://es01:9200/_security/user/kibana_system/_password -d "{\"password\":\"${KIBANA_PASSWORD}\"}" | grep -q "^{}"; do sleep 10; done; echo "All done!"; ' healthcheck: test: ["CMD-SHELL", "[ -f config/certs/es01/es01.crt ]"] interval: 1s timeout: 5s retries: 120 es01: depends_on: setup: condition: service_healthy image: docker.elastic.co/elasticsearch/elasticsearch:${STACK_VERSION} volumes: - certs:/usr/share/elasticsearch/config/certs - esdata01:/usr/share/elasticsearch/data ports: - ${ES_PORT}:9200 environment: - node.name=es01 - cluster.name=${CLUSTER_NAME} - cluster.initial_master_nodes=es01 - ELASTIC_PASSWORD=${ELASTIC_PASSWORD} - bootstrap.memory_lock=true - xpack.security.enabled=true - xpack.security.http.ssl.enabled=true - xpack.security.http.ssl.key=certs/es01/es01.key - xpack.security.http.ssl.certificate=certs/es01/es01.crt - xpack.security.http.ssl.certificate_authorities=certs/ca/ca.crt - xpack.security.http.ssl.verification_mode=certificate - xpack.security.transport.ssl.enabled=true - xpack.security.transport.ssl.key=certs/es01/es01.key - xpack.security.transport.ssl.certificate=certs/es01/es01.crt - xpack.security.transport.ssl.certificate_authorities=certs/ca/ca.crt - xpack.security.transport.ssl.verification_mode=certificate - xpack.license.self_generated.type=${LICENSE} mem_limit: ${MEM_LIMIT} ulimits: memlock: soft: -1 hard: -1 healthcheck: test: [ "CMD-SHELL", "curl -s --cacert config/certs/ca/ca.crt https://localhost:9200 | grep -q 'missing authentication credentials'", ] interval: 10s timeout: 10s retries: 120 kibana: depends_on: es01: condition: service_healthy image: docker.elastic.co/kibana/kibana:${STACK_VERSION} volumes: - certs:/usr/share/kibana/config/certs - kibanadata:/usr/share/kibana/data ports: - ${KIBANA_PORT}:5601 environment: - SERVERNAME=kibana - ELASTICSEARCH_HOSTS=https://es01:9200 - ELASTICSEARCH_USERNAME=kibana_system - ELASTICSEARCH_PASSWORD=${KIBANA_PASSWORD} - ELASTICSEARCH_SSL_CERTIFICATEAUTHORITIES=config/certs/ca/ca.crt - ENTERPRISESEARCH_HOST=http://enterprisesearch:${ENTERPRISE_SEARCH_PORT} mem_limit: ${MEM_LIMIT} healthcheck: test: [ "CMD-SHELL", "curl -s -I http://localhost:5601 | grep -q 'HTTP/1.1 302 Found'", ] interval: 10s timeout: 10s retries: 120 enterprisesearch: depends_on: es01: condition: service_healthy kibana: condition: service_healthy image: docker.elastic.co/enterprise-search/enterprise-search:${STACK_VERSION} volumes: - certs:/usr/share/enterprise-search/config/certs - enterprisesearchdata:/usr/share/enterprise-search/config ports: - ${ENTERPRISE_SEARCH_PORT}:3002 environment: - SERVERNAME=enterprisesearch - secret_management.encryption_keys=[${ENCRYPTION_KEYS}] - allow_es_settings_modification=true - elasticsearch.host=https://es01:9200 - elasticsearch.username=elastic - elasticsearch.password=${ELASTIC_PASSWORD} - elasticsearch.ssl.enabled=true - app_search.engine.total_fields.limit=128 - elasticsearch.ssl.certificate_authority=/usr/share/enterprise-search/config/certs/ca/ca.crt - kibana.external_url=http://kibana:5601 mem_limit: ${MEM_LIMIT} healthcheck: test: [ "CMD-SHELL", "curl -s -I http://localhost:3002 | grep -q 'HTTP/1.1 302 Found'", ] interval: 10s timeout: 10s retries: 120 volumes: certs: driver: local enterprisesearchdata: driver: local esdata01: driver: local kibanadata: driver: localNote that there're custom settings for
enterprisesearchin yml file:app_search.engine.total_fields.limit=128 - Bring up the Elastic cluster with the following command (execute it from the directory where the
.ymlfile is):- Access Kibana at http://localhost:5601. Log in with userdocker-compose upelastic. The password is the value you provided for ELASTIC_PASSWORD in your .env file. Access Elasticsearch at http://localhost:9200. More info on deploying using Docker at Elastic App Search Docker
- Create a directory and create a file named
Set up Elastic App Search on Platform
- Install vc-module-elastic-app-search module.
- Modify Platform configuration to use Elastic App Search
"Search": { "Provider": "ElasticAppSearch", "Scope": "default", "ElasticAppSearch": { "Endpoint": "https://localhost:3002", "PrivateApiKey": "private-key", "KibanaBaseUrl": "https://localhost:5601" } } -
Open
Kibana(localhost:5601), navigate toEnterprise Search-Open App Search-Credentials, copy Private Key and assign it to PrivateApiKey setting.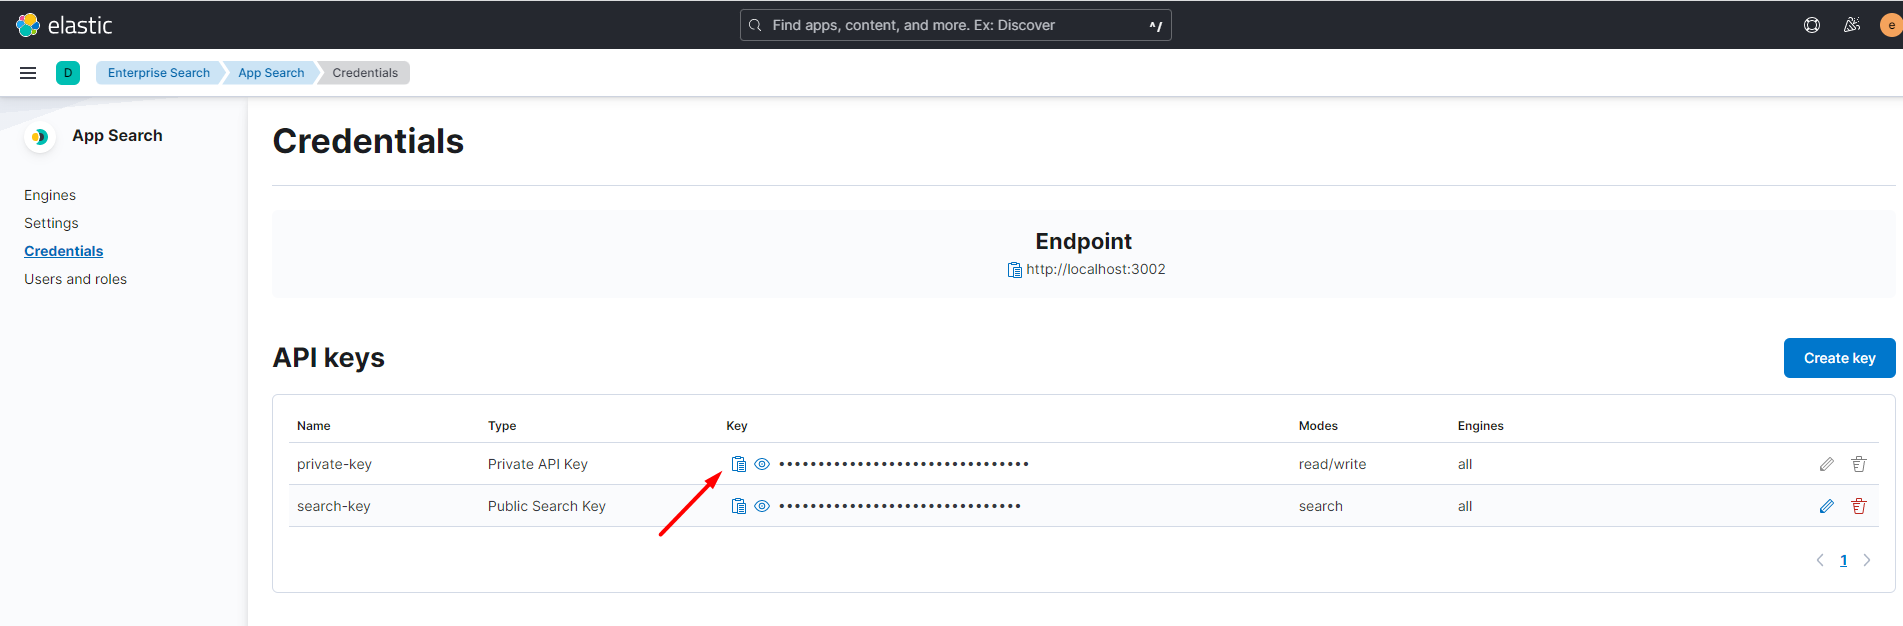
-
Run the Platform and build the indices. You should see that Provided is
ElasticAppSearch.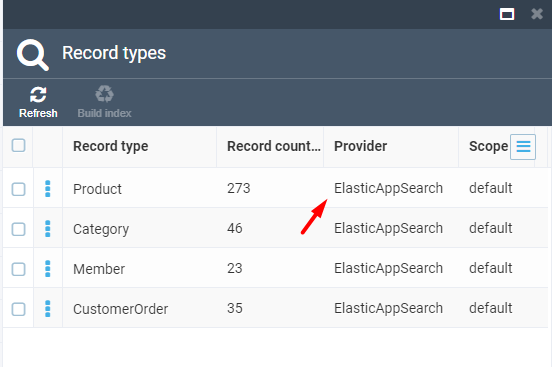
-
Navigate back to
Kibanaand confirm that Engines (indices) are created.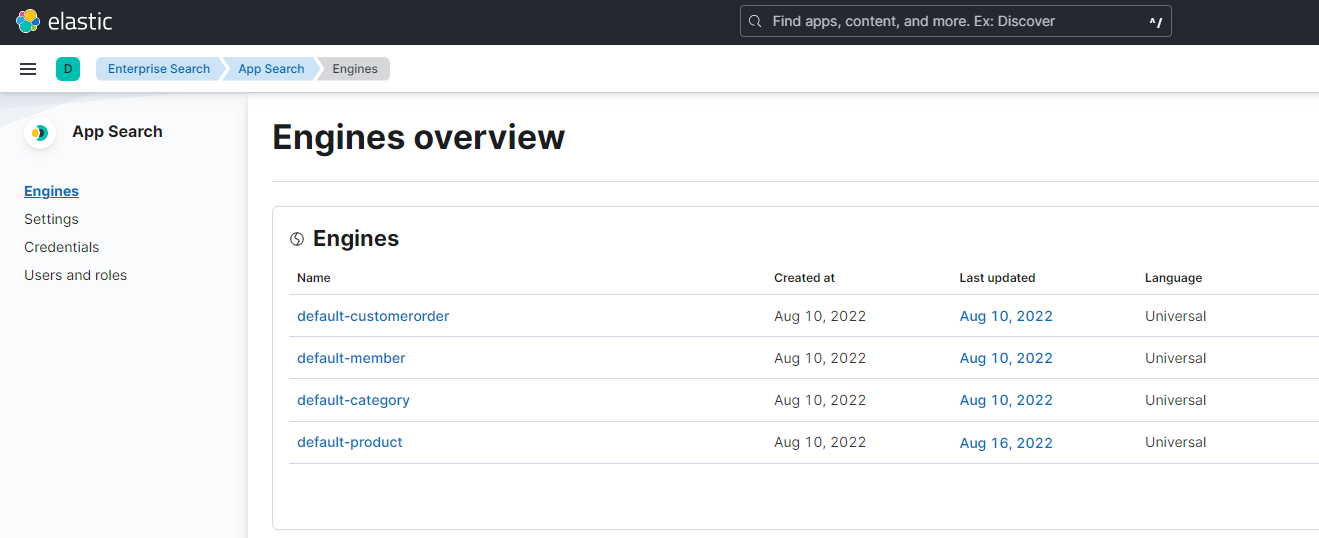
Setup App Search menu
To provide seamless naviagation from Commerce Manager to App Search (Kibana), you need to configure two settings: KibanaBaseUrl and KibanaPath.
KibanaBaseUrl: A string field that provides the base URL for accessing the Kibana Dashboard from the application menu. The KibanaBaseUrl field is used to construct the URL for accessing the Kibana Dashboard, and should be set to the root URL of the Kibana instance.
KibanaPath: A string field that specifies the path to the App Search engine in the Kibana Dashboard. The KibanaPath field is used to construct the complete URL for accessing the App Search engine in Kibana. By default, the KibanaPath is set to "/app/enterprise_search/app_search/engines/", but it can be customized to match the specific path used in your Kibana instance.
Together, these fields allow users to easily access the Kibana Dashboard from the application menu, and navigate directly to the App Search engine without having to manually enter the URL.
Inside Elastic App Search
-
In
Kibanaopen App SearchEnginesoverview page. Here can see four Engines that were created after we rebuilt the indices. If we click onproductsengine we can see general analytics about incoming queries and can manage indexed documents and tune engine behavior withRelevance Tuning,SynonymsandCurations. -
Open
Documentsmenu to examine all indexed documents and their contents. -
Open
Schemamenu to look at what fields are present in the documents. We can examine product index contents in Platform admin UI by opening a products blade and clicking on Index widget. -
Open
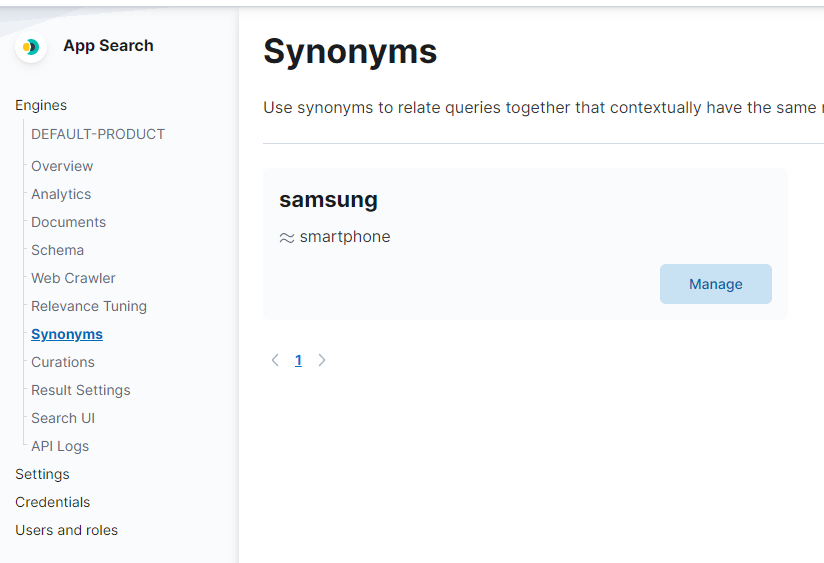
Synonymsand add search query synonyms. By associating the 'Sony' keyword with 'Samsung' keyword and trying out the same query as before we can see that result set is different - we also get all documents that are relevant to the 'Samsung' keyword. Go to Storefront and see that integration works and we getSonyandSamsungproducts bySonykeyword.
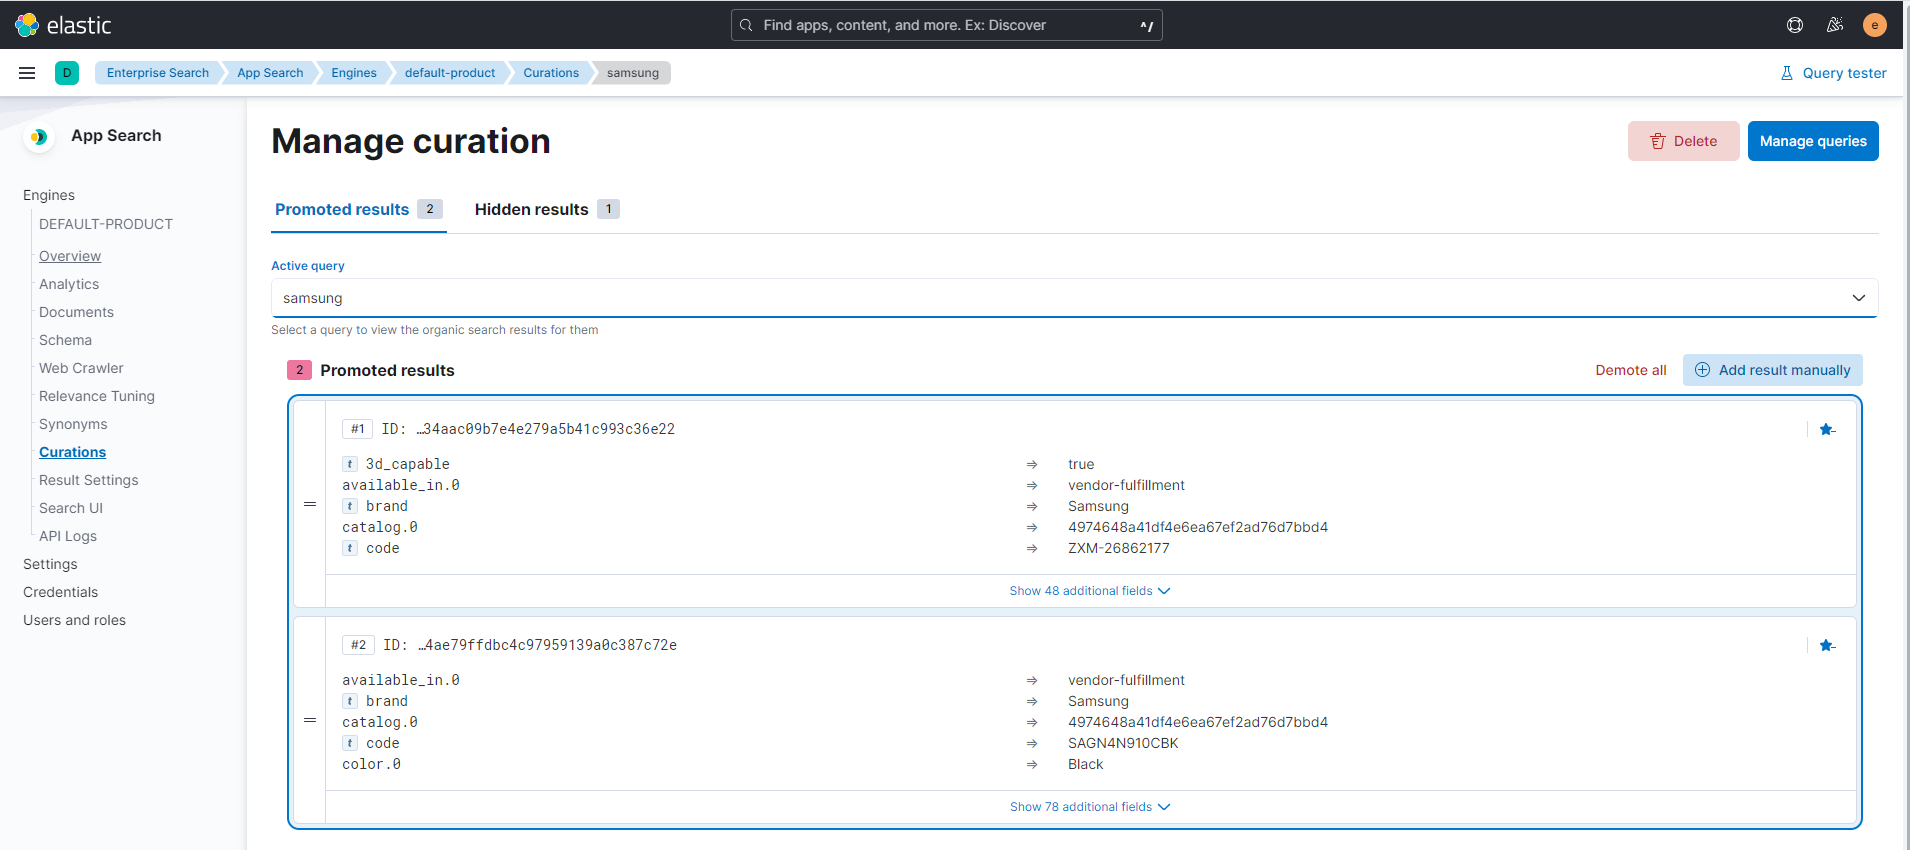
Curationsis a tool by which we handpick results for certain search queries. Search bySonykeyword again and examine the entries. Here we can delete a certain document from result set by clicking the delete button and a new document by clicking theAdd manuallybutton and selecting a document from a different result set. Save the curation and check it in the Storefront.