Integration with SkyFlow
The Skyflow module facilitates seamless integration with SkyFlow, a Data Privacy Vault service, enabling secure payment processing within Virto Commerce Platform. This integration ensures compliance with industry standards for handling payment data securely while offering a unified experience for credit card transactions.

Key Features
- Unified Credit Card User Experience: Enhance user payment journeys with a consistent credit card transaction experience across multiple payment providers.
- PCI Compliance: Ensure PCI compliance with SkyFlow, simplifying adherence to industry standards for secure payment data handling.
- Integration with Virto Storefront: Seamlessly integrate with Virto Storefront to provide a cohesive e-commerce experience.
- Flexible Customization: Utilize the flexibility of the Virto Commerce Native Extensibility Framework and SkyFlow to tailor integrations with a variety of payment providers to meet your specific requirements.
- Optimized for Marketplaces: Streamline marketplace operations by effortlessly connecting with multiple Payment Service Providers, catering to diverse payment preferences for customers and suppliers.
- Saved Credit Card (coming soon): Enhance convenience and checkout speed by offering customers the ability to securely save their credit card information for future transactions (upcoming feature).
Prerequisites
- SkyFlow Account: Create and configure your SkyFlow Account to take full advantage of the module.
- Authorize.NET Account: Create and configure your Authorize.NET Account for seamless integration with the module.
- Installation: Install the SkyFlow Module to start using its powerful features and functionality.
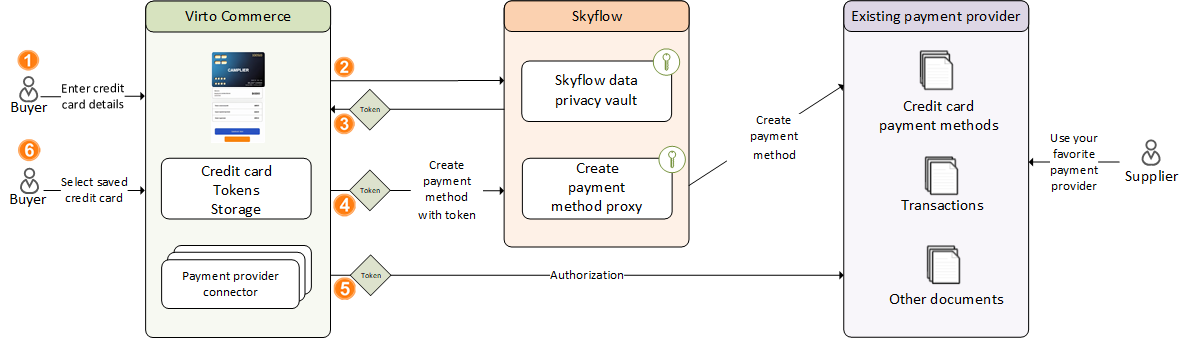
Architecture
![]() Order Placement:
Order Placement:
- As a customer, I add items to my cart and proceed to checkout.
- On the payment selection page, I see a Credit Card option.
![]() Credit Card Payment Form:
Credit Card Payment Form:
- I select the "Credit Card" payment method.
- The frontend displays a Credit Card form built with PCI compliance and Skyflow integration, maintaining the current design of the platform.
- I enter my Credit Card details securely into the form.
![]() Tokenization Process:
Tokenization Process:
- I submit the form, and the payment process utilizes Skyflow for PCI-compliant Credit Card storage.
- Skyflow tokenizes my Credit Card information securely.
![]() Transaction Processing:
Transaction Processing:
- The tokenized Credit Card information is seamlessly integrated with Payment processing through SkyFlow.
- The transaction is created successfully via Authorize.NET.
![]() Payment Document Creation:
Payment Document Creation:
- A Payment document is automatically created within Virto Commerce Payment Processing for the Credit Card transaction.
- This Payment document includes all necessary details for tracking and processing the transaction within the Virto Commerce platform.
![]() Saved Credit Card:
Saved Credit Card:
- The Skyflow-generated token for Credit Card is stored within the Virto Commerce Payment document securely.
- Virto Commerce can save the token and use later as a Saved Credit Card.
Setup
To integrate Skyflow with Virto Commerce for secure payment processing:
Configure Skyflow
Skyflow configuration includes creating:
Create Roles
To create a role:
- Sign in to Skyflow Portal.
- Create a system role named Vault Editor for frontend operations. This role will be responsible for sending card data to Skyflow.
- When creating a connection, the second system role is automatically generated and associated with the connection.
Create Authorize.NET Connectors
To create Authorize.NET connectors:
- Create a new connector.
- Modify Connector via RestAPI:
- If default connections are not suitable (e.g., mismatched card number format), modify the connector via RestAPI.
- Use the Update Outbound Connection endpoint to adjust the connector's configuration according to your requirements.
- Generate and save credentials file.
Configure Virto Commerce
Configuring Virto Commerce includes:
Configure Appsettings.json
- Configure Skyflow Settings:
- Update the
appsettings.jsonfile with Skyflow configuration underPayments:Skyflowsection: tokenURI: Ensure it is always set tohttps://manage.skyflowapis.com/v1/auth/sa/oauth/token.ClientSDK: Provide SkyflowCredentials includingclientID,keyID, andprivateKeyfrom the loaded credentials file.Connections: Register any number of Connections with their respective SkyflowCredentials.
- Update the
- Default settings are configured in the
appsettings.jsonunderPayments/Skyflow/DefaultConnection. In our case, Authorize.NET.
{
  "Payments": {
    "Skyflow": {
      "tokenURI": "https://manage.skyflowapis.com/v1/auth/sa/oauth/token",
      "clientSDK": {
        "clientID": "b7eeb4df0007492cbef5bd1000000000",
        "keyID": "i24bb5b53c114f1c9531db69000000000",
        "privateKey": "-----BEGIN PRIVATE KEY---TODO---END PRIVATE KEY-----"
      },
      "Connections": {
        "Default": {
          "clientID": "ca2836c68afa4546b6e09b000000000",
          "keyID": "hd75811c6f4b4ed4835eda00000000",
          "privateKey": "-----BEGIN PRIVATE KEY---TODO---END PRIVATE KEY-----"
        }
      },
      "DefaultConnection": {
        "connectionUrl": "https://ebfc00000000.gateway.skyflowapis.com/v1/gateway/outboundRoutes/gfb5ce07e91340efac348a2df00000000/xml/v1/request.api",
        "name": "TODO:YOURID",
        "transactionKey": "TODO:YOUR_TRANSACTION_KEY"
      }
    }
  }
}
Setup Virto Commerce Back Office
To setup Virto Commerce back office:
- Go to Virto Commerce Back Office and click Stores in the main menu.
- In the next blade, select a store.
-
In the Store details blade, click on the Payment methods widget.

-
In the Payment methods blade, select SkyFlow.
- In the Edit payment method blade, activate the Skyflow payment method.
- In the same blade, click on the Settings widget.
-
In the next blade, fill in the following properties:
VaultIdandVaultUrl: Retrieve from the settings in Skyflow.TableName: Specify the name of the table for storing Credit Card data.
-
Click OK to save the changes.
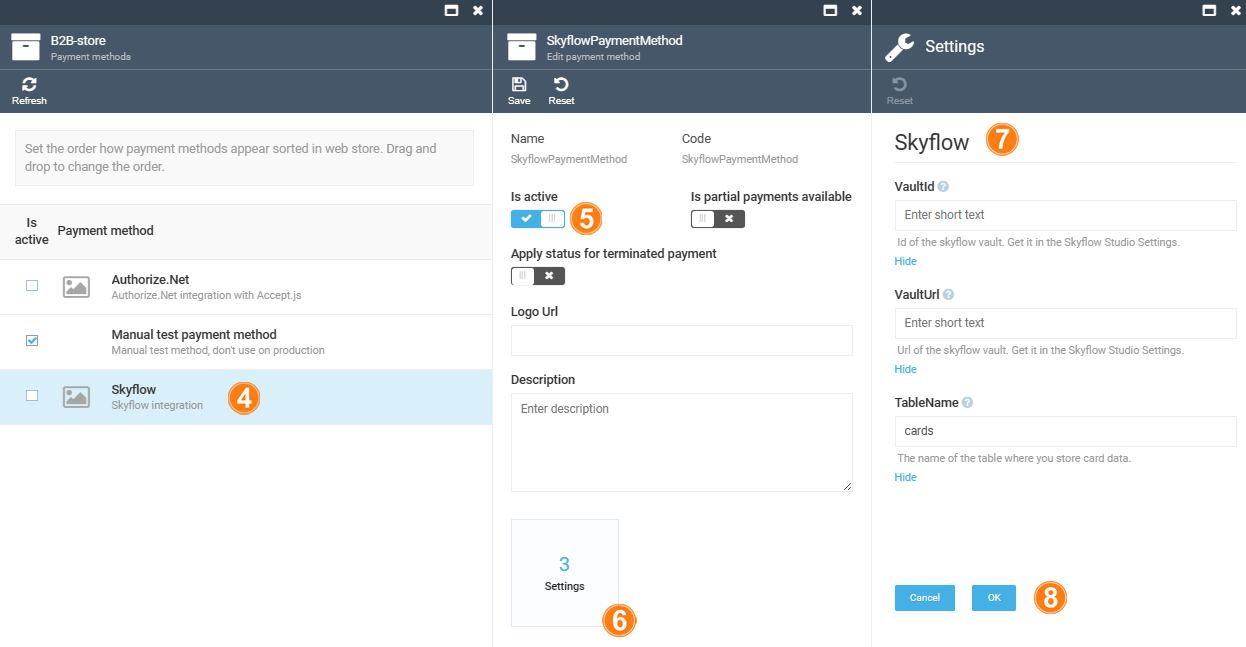
The SkyFlow payment method has been activated for the Store.
Customization
To customize the module:
- Integrate it with Payment Providers:
- By default, the module supports Authorize.NET payment provider.
- To integrate with another provider or implement custom orchestration:
- Create a new Virto Commerce Module.
- Implement IPaymentClient interface.
- Register
IPaymentClientinIPaymentClientFactory.
- Use
SkyflowPaymentMethodclass for:initializePayment(in GraphQL): Returns a token for frontend operations.authorizePayment: InvokesIPaymentClientFactoryto obtain an instance ofIPaymentClientfor processing transactions using the required Connection.